Adeptas Sororitas Regenesis Project
+6
Planes
ScottRadom
Roland
Deadlytoaster
Selik
dusktiger
10 posters
Page 1 of 4
Page 1 of 4 • 1, 2, 3, 4 
 Adeptas Sororitas Regenesis Project
so selik's commissioned me to bring his SoB army up to a nicer tabletop standard than they currently are. we agreed upon a general price range, to which he surprised me by generously paying more upfront than i expected to see.
the following is a set of before shots of what the average sister looks like:


My goal is to make these look like something he could win best painted awards (assuming certain gamers, such as Paz or Ben aren't around ) in the local tournaments.
i don't know if he has an actual name for his DIY order, so from here on, i've decided to refer to his army's color scheme as that of The Order of the Azure Wave due to his choice of colors and in lieu of the fact i know he's a Navy man.
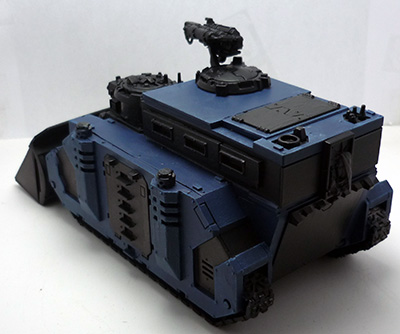
so here's the results of 2 hours of work on that same model i just showed you. i present, the reborn Order of the Azure Wave:


so kevin, how do you like the new color scheme??
the following is a set of before shots of what the average sister looks like:


My goal is to make these look like something he could win best painted awards (assuming certain gamers, such as Paz or Ben aren't around
i don't know if he has an actual name for his DIY order, so from here on, i've decided to refer to his army's color scheme as that of The Order of the Azure Wave due to his choice of colors and in lieu of the fact i know he's a Navy man.
so here's the results of 2 hours of work on that same model i just showed you. i present, the reborn Order of the Azure Wave:


so kevin, how do you like the new color scheme??
Last edited by dusktiger on Sun Sep 16, 2012 12:40 pm; edited 1 time in total
 Re: Adeptas Sororitas Regenesis Project
I am starting to like it. Seeing as I am geting a fair bit done, I thought that a certain amount was good to have a good show of faith for payment of what I am to get done.
It will be nice to see the other unique squads to SOB painted.
It will be nice to see the other unique squads to SOB painted.

Selik- Crusader
- Posts : 240
Join date : 2010-08-23
Age : 49
Location : langham
 Re: Adeptas Sororitas Regenesis Project
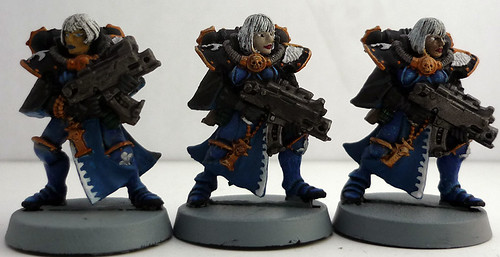
3 sisters complete. though im not sure im happy with the hair and eyes of the one on the left. tried blue eyes and it just doesnt seem to work. the pic also makes her hair look too white, but its not that bad in person; the flash just hit it wrong despite my best efforts.


Last edited by dusktiger on Sun Sep 16, 2012 12:43 pm; edited 1 time in total
 Re: Adeptas Sororitas Regenesis Project
As I see them together with their BPs on, they are looking beter. I am looking forward to fielding the army.

Selik- Crusader
- Posts : 240
Join date : 2010-08-23
Age : 49
Location : langham
 Re: Adeptas Sororitas Regenesis Project
Phase I: 2 meltagun sisters, 2 flamer sisters, 2 sister superiors, 14 battle sisters, 1 repressor.
Sisters completed Count: 4 battle sisters.
Sisters completed Count: 4 battle sisters.
 Re: Adeptas Sororitas Regenesis Project
started on a sister superior, i've replaced the sword with a new blade, and given her a godwyn pattern boltgun to replace the old umbra pattern one.


 Re: Adeptas Sororitas Regenesis Project
as I start seeing them together these are starting to look real nice.

Selik- Crusader
- Posts : 240
Join date : 2010-08-23
Age : 49
Location : langham
 Re: Adeptas Sororitas Regenesis Project
Sword was a nice touch, a little small to a Dark Angels termy, but a nice two hander for a sister  Your paint lines look good (nice and clean). Do you plan to use any washes on the gold? generally a nice brown wash followed by re-drybrushing the gold yeilds a warmer effect to it.
Otherwise phenomenal job (i am a rather messy painter myself as i dont think i have as steady a hand as you, hence the reason i dislike painting bare faces )
)
Otherwise phenomenal job (i am a rather messy painter myself as i dont think i have as steady a hand as you, hence the reason i dislike painting bare faces

Deadlytoaster- Inquisitor
- Posts : 502
Join date : 2012-06-27
 blue tutorial
so here's the blue armor in steps for anyone curious. i didnt bother with photos for steps 1 and 2 because im not starting this off as a new primered model.
Step 1 - basecoat - Base - Kantor Blue
Step 2 - wash - Shade - Drakenhof Nightshade
at this point, your model's going to be a very dark blue with almost-black looking areas where the shade pooled into the recesses.
Step 3 - layering - Layer - Altdorf Guard Blue

this step you want to start in the middle of the armour plate your painting, and paint towards the edges until you get to the thickness of dark edging you want to stay visible on the model. this varies based on the viewing angle and where on the body it is; sometimes you want more of the dark blue to appear on the underside of an arm for example.
Step 4 - edge highlighting - Layer - Hoeth Blue

this is painted onto any raised parts of the armor, and along all the edges exposed to light.
Step 5 - drybrushing - Dry - Skink Blue

now we drybrush all the blue armor. its ok if this gets onto your flat panels of armor plating a little bit because of what we do in step 6.
Step 6 - glazing - Glaze - Guilliman Blue

i cant stress enough how different glazes are to shades; these do not pool or bleed out evenly onto the model. these will stay where you paint them, so do very thin coats until you get the depth your looking for. i found even dipping half the tip of a smaller citadel standard brush in was too much, so i'd dab it once on paper towel to get the excess off before applying it.
recap:

Step 1 - basecoat - Base - Kantor Blue
Step 2 - wash - Shade - Drakenhof Nightshade
at this point, your model's going to be a very dark blue with almost-black looking areas where the shade pooled into the recesses.
Step 3 - layering - Layer - Altdorf Guard Blue

this step you want to start in the middle of the armour plate your painting, and paint towards the edges until you get to the thickness of dark edging you want to stay visible on the model. this varies based on the viewing angle and where on the body it is; sometimes you want more of the dark blue to appear on the underside of an arm for example.
Step 4 - edge highlighting - Layer - Hoeth Blue

this is painted onto any raised parts of the armor, and along all the edges exposed to light.
Step 5 - drybrushing - Dry - Skink Blue

now we drybrush all the blue armor. its ok if this gets onto your flat panels of armor plating a little bit because of what we do in step 6.
Step 6 - glazing - Glaze - Guilliman Blue

i cant stress enough how different glazes are to shades; these do not pool or bleed out evenly onto the model. these will stay where you paint them, so do very thin coats until you get the depth your looking for. i found even dipping half the tip of a smaller citadel standard brush in was too much, so i'd dab it once on paper towel to get the excess off before applying it.
recap:

 Re: Adeptas Sororitas Regenesis Project
Looking good. Is something off with the links, all I see is wall of text here.

Roland- Lord of Titan
- Posts : 3544
Join date : 2011-01-26
Location : Saskatoon
 Re: Adeptas Sororitas Regenesis Project
dan mentioned something about that too. i'll see about changing them. odd, cause they worked for me.
 Re: Adeptas Sororitas Regenesis Project
For your reference, the first ones I can see are "Changed the sword on the sister superior"

Roland- Lord of Titan
- Posts : 3544
Join date : 2011-01-26
Location : Saskatoon
 Re: Adeptas Sororitas Regenesis Project
links are fixed, give it a refresh there beau and they should appear now
 Re: Adeptas Sororitas Regenesis Project
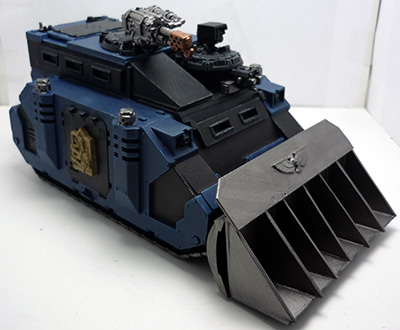
little more work on the repressor. still needs the sandstone reliefs to be finished, and the lenses



 Re: Adeptas Sororitas Regenesis Project
actually seeing the models in person was good. the show better I think. but I think it must be nice for you to paint something dif than what have been doing. I can not wait to field the army when they are done!

Selik- Crusader
- Posts : 240
Join date : 2010-08-23
Age : 49
Location : langham
 Re: Adeptas Sororitas Regenesis Project
Phase I:
2 Meltagun Sisters, 1 Sister Superior with Sword, 7 Battle Sisters
2 Flamer Sisters, 1 Sister Superior with Sword, 7 Battle Sisters
1 Repressor.
Sisters Completed Count: 6 Battle Sisters, 1 Sister Superior.
Phase II:
2 Meltagun Sisters, 2 Flamer Sisters, 1 Sister Superior with Chainsword & Plasma Pistol, 5 Battle Sisters
3 Multi-melta Sisters, 1 Heavy Bolter Sister, 1 Sister Superior with Storm Bolter, 5 Battle Sisters
2 Exorcist Tanks
1 "Command" Rhino
 Re: Adeptas Sororitas Regenesis Project
CONVERSIONS!
just giving these girls a cool paint job isn't enough. they need accessory make overs too.
The two on the left are basic sisters with flamers.
The middle one is the first of 2 flamer girls for a Dominion Squad
The 2 melta girls are also from the Dominion Squad.

as you can see, i've changed the flamer barrels up to make them look different and stand out more, with the Dominion flamer being made to look more boss. The 2 melta girls have masks now to fit in with the flamer girls that will also be in the dominion squad.
just giving these girls a cool paint job isn't enough. they need accessory make overs too.
The two on the left are basic sisters with flamers.
The middle one is the first of 2 flamer girls for a Dominion Squad
The 2 melta girls are also from the Dominion Squad.

as you can see, i've changed the flamer barrels up to make them look different and stand out more, with the Dominion flamer being made to look more boss. The 2 melta girls have masks now to fit in with the flamer girls that will also be in the dominion squad.
 Re: Adeptas Sororitas Regenesis Project
dusktiger wrote:My goal is to make these look like something he could win best painted awards (assuming certain gamers, such as Paz or Ben aren't around) in the local tournaments.
You're still trying to run before getting the hang of walking.
-Thin your paint. A good guideline is around 4 coats of thinned base colour to get you good coverage. This should result in a smooth looking mini and will solve more than 1/2 the issues with your mini's.
-Keep it simple! You're trying to paint blue eyes on a 28mm miniature? Congrats if you make it happen but that is something most painters that aren't competing for a slayer sword don't worry about.
-Strong shading and strong edge highlighing. You could do worse than wash your mini's with a thinned black wash after basecoating. Re apply your basecoat in thin layers, then maybe add some bleached bone or whit to the basecoat and thin it down some more. Apply this mix very sparingly to the mini in spots heading away from the recesses. Don't worry about where the light would fall or anything like that. Just work away from the shading. Then hit the edges with a mix of mostly white/bone and some of the base mix. Keep it thin and keep it on the edges. The darker your shading and the lighter your highlights the better your mini's will look form 3 feet away.
-Start ripping off other peoples tech! If you like the way Paz and Ben paint try asking them how they do certain things.
You'll start painting like a champ if you start practicing like a champ. Keep it slow and simple. Each group of mini's you paint should teach you something that you can use on the next group. Don't go for shortcuts!

ScottRadom- Lord of Titan
- Posts : 1167
Join date : 2008-03-20
Age : 48
Location : Saskatoon Represent!
 Re: Adeptas Sororitas Regenesis Project
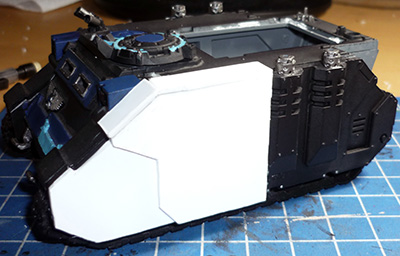
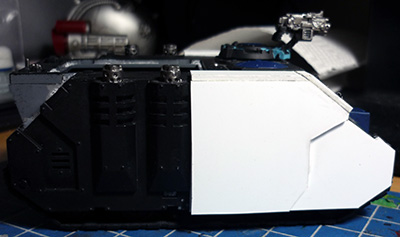
been working on one of the exorcist tanks, but im on hold atm cause i cut up my hand working on this one and having a hard time holding stuff steady to work on it any further. but here's what i got done so far:
i started off by cutting the front exhausts off and glueing them back on further back near the rear set.
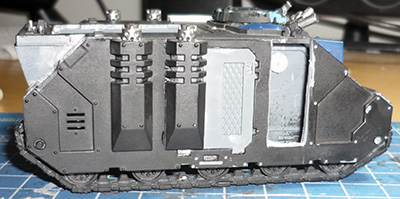

then i built up some reinforced armour plating where the gaping holes now are:



i also ordered a pair of these to use as the new missile launchers to make it look like the FW ones, but at 1/3 the cost.:

i started off by cutting the front exhausts off and glueing them back on further back near the rear set.


then i built up some reinforced armour plating where the gaping holes now are:


i also ordered a pair of these to use as the new missile launchers to make it look like the FW ones, but at 1/3 the cost.:

 Re: Adeptas Sororitas Regenesis Project
I recognize that polish resin anywhere. Same guys that did my Dread's arms and the Assault Cannons for my Razorbacks. Be forewarned, that resin isn't held to the same standard as what GW puts out, so a bit of blade work and possibly some Green Stuff will be required. That being said, though, they do put out some spiffy looking stuff. I like how the plasticard is coming along.

Planes- Lord of Titan
- Posts : 3156
Join date : 2011-11-27
Location : Mai'laun
 Re: Adeptas Sororitas Regenesis Project
Are you doing more with the extra armour? It looks very flat and bulky.

Gain- Assassin
- Posts : 337
Join date : 2011-10-29
Location : Saskatoon
 Re: Adeptas Sororitas Regenesis Project
im hoping to find some small little beads or something and countersink them into the armour to make rivets. right now im looking around for something that would work and not look oversized since some of the original rivets are still showing.
also, if anyone has some of those SoB disc symbols that go on the doors, would you be willing to barter or something for them? i would help to break up the plainness of those larger plates.
also, if anyone has some of those SoB disc symbols that go on the doors, would you be willing to barter or something for them? i would help to break up the plainness of those larger plates.
Page 1 of 4 • 1, 2, 3, 4 
 Similar topics
» Ben's Biggest project ever!
» little truck mod project
» The Daemon Project...
» Knight project
» A terrain project
» little truck mod project
» The Daemon Project...
» Knight project
» A terrain project
Page 1 of 4
Permissions in this forum:
You cannot reply to topics in this forum
 Home
Home Gallery
 Register
 Log in


